Friday, August 30

ON IT'S WAY SIMPLY SENT CARD KIT

OH MY GOODNESS, THIS SIMPLY SENT CARD KIT IS SO MUCH FUN!!  If you missed my post yesterday, I got my welcome Paper Pumpkin Kit and put the cards together in less than 20 minutes.  It was so stinkin' fun that I had to immediately get my Simply Sent Kit out and make those cards too!!

 The card base has shiny stripes on it.  Sorry you can't see them very well  in the photos.  The sticky die cuts are very pretty and I love the arrows!!  Look at the cute paper clip adornments.  LOVE THEM.

The only difference between the Paper Pumpkin Welcome Kit contents and this Simply Sent kit that I can see is there are no stamps in the Simply Sent Kit and no ink spot.  BUT you get more cards to make!!


 I used several different stamps on my cards.  This 'Hey there friend" is from the Welcome Paper Pumpkin Kit.  Looks good on this die cut!!

 This "it's the LITTLE things" comes from a retired set and it works well here.  I also added the candy dots.

 The "you're a gem" is also from a retired set and I added one candy dot here.  Still looking cute!!

The kraft envelopes included in the kit are very thick and sturdy and perfect for mailing these cards.

I LOVED putting together this ON IT'S WAY SIMPLY SENT CARD KIT just as much as I enjoyed putting together My Paper Pumpkin.  It was awesome.  It was fun.  It was quick.  IT WAS WORTH PURCHASING IT.  I even have some of the sticky die cuts left over because they sent more than what was needed for the cards.  AWESOME - now I can make a few more cards!!

The item number is 131373 - ON IT'S WAY SIMPLY SENT CARD KIT.

If you don't have a demonstrator, I would love to become your demonstrator.  Click my signature line to order your kit now!!

I can't wait to order another kit soon.  It was so much fun and filled the need I had to get some cards done quickly and mailed out quickly.

Thanks for stopping by!!

I am entering these cards at:

Challenges 4 Everybody

Thursday, August 29

MY CARDS MADE WITH THE PAPER PUMPKIN KIT

OH MY GOODNESS --- I HAVE SOMETHING TO CONFESS---I LOVE CARD KITS!!!

Why haven't I told you before??  WELL, I didn't know this fact until today!!

I received my welcome PAPER PUMPKIN KIT and had to sit down and create the cards immediately. They are so stinking cute and it was so fast and easy.  I LOVED IT.  Don't get me wrong -- I also love creating complicated and amazing cards that take me hours to design.  BUT now that I have made cards from a kit I AM IN LOVE WITH KITS.

There are times when you need some cards and don't have time to create something.  That's where these kits come in handy.  No need to design, worry, hunt for supplies, etc. with these kits - just open up and put together.  LOVE IT.

Here are my Paper Pumpkin cards I made in less than 20 minutes:

 They are cute and they were fun.  Sticky die cuts are the bomb!!  And the little grunge splat stamp was fun to use.  Not to mention the basic gray stampin' ink spot.

The kit showed the button "naked" but I just couldn't let it be naked, so I snipped a piece of the remaining yellow sticker from the kit and threaded it through to the back.  There, much better.

 The only other different thing I did was stamp two "splats" on the envelope to coordinate with the card.  Did I mention that the envies came with it as well??


Here is a closeup of one of the cards.  YOU NEEEED THIS PAPER PUMPKIN INTRO KIT.

Do you remember that you can get it for only $10  per month for the first TWO MONTHS?  BUT you MUST sign up before the end of the month to get the special AND you MUST use the special code:

                                                                PUMPKINDEAL 

Well, I loved making this kit up so very much that I have now opened up my ON IT'S WAY SIMPLY SENT KIT and made those up as well.  I will share them with you tomorrow.

NEVER BEFORE HAVE I MADE 12 CARDS IN LESS THAN 45 MINUTES!!!  N E V E R!!  IT WAS AWESOME!!

Thanks for stopping by.  You must come back tomorrow to see my 8 cards from the SIMPLY SENT KIT, ok?  See you then...

Wednesday, August 28

THANK YOU CANDY BAR COVER

Sometimes we just need a quick little treat to show our appreciation to someone...teachers, friends, babysitters, neighbors, etc.  I created this simple and quick thank you after I saw an idea on the web from another demonstrator.  I am sorry I don't know the name of the demo and the photo did not have a water mark on it.

 I used rich razzleberry as the color with my whisper white.  I used both chalk talk and flower shop stamp sets, punches and dies.  I also used fire and ice brads for the center of the flower.

This designer paper is covering a Hershey's milk chocolate candy bar.  Just the perfect little treat to show someone you care!!


Thanks for stopping by my blog.  Stop by again for some more photos of my creations.

ESPECIALLY plan to stop by on Sept 3, 4 and 5 because I will be in a Halloween blog hop with several of my friends and we have some fun things planned for you.


Monday, August 26

LNS CHALLENGE BLOG - SUMMERTIME

HI BLOGGIES,

       I had a hard time with this subject because I think I was wanting something that was literal- SUMMERTIME.  I just don't seem to have any stamp sets with a summertime activity on them.  BUT then I started thinking "outside the box" and decided on coastal cabana card stock.  I mean, what says summertime more than the beautiful color of the Caribbean Sea on a warm summer day??

       So my card for this challenge is made with summertime coastal cabana  as well as baked brown sugar because it is the color of the rocks along the shoreline of some of the islands in the Caribbean AND because many people like to BAKE in the sun to get a tan the color of BROWN SUGAR.

I know, I know I am really stretching it, but I think it fits the challenge.

 This CHALK TALK BUNDLE of stamps and framelits are so much fun!! I stamped with the baked brown sugar ink on the coastal cabana card stock and then die cut the tab out.  I stamped again on very vanilla with soft suede and had cut out the banner to add to the bag.


 I made a flower with the Stampin Up paper clay and the flowers and buttons mold and after it had dried over night I used my markers to add some color.  I also added some Tombow glue and some dazzling diamonds to give it a bit of sparkle.  I first tied a 1/8 ribbon ribbon thru the tag before adhering the flower to the tag.

On the left side of the card, I put some of this yummy baked brown sugar stretch ruffled ribbon under the baked brown sugar layer.  Then a layer of coastal cabana and then a very thin sgp of the baked brown sugar running along the edge.


Here is one more look now that you have heard how I created it.  Doesn't that thin strip really make it so pretty?  I forgot to tell you that the base of the card is soft suede and that I also used the square lattice embossing folder on the coastal cabana layer.

Thanks for stopping by to view my creations.  I would LOVE to hear your comments please.

Come back again soon.  I am going to be in blog hop September 3-5 for Fall and Halloween ideas.

Late Night Stampers Challenge


Sunday, August 25

PAPER PUMPKIN SPECIAL 1/2 PRICE - JUST A FEW MORE DAYS TO SIGN UP


You can still sign up to receive TWO MONTHS of Paper Pumpkin monthly kits for only $10 (postage already included) plus tax.  You have until AUGUST 31ST to sign up to receive this special pricing for two months.

After the two months, you may continue receiving your monthly kit for $19.99 plus tax (postage included in price) OR you may SUSPEND or CANCEL your subscription. There is no further obligation to receive any more kits if you don't want to. You MUST make your decision to change your order no later than the 10th of the month.   Or at any time you can choose to suspend your subscription for one month or more and then start up again at the regular price of $19.99.

THE FIRST KIT YOU GET IS THE WELCOME KIT and it has a FREE GIFT with it - a FREE CLEAR ACRYLIC BLOCK to mount your stamps!!  That is almost the whole total cost of the $10 kit!!  Plus you will get card bases cut and folded, envelopes, die cuts, stickers, buttons, 2 stampin' spots, bakers twine and directions on what they envisioned when they created your kit!!

Here is a photo of what all is included in the WELCOME KIT of your PAPER PUMPKIN:

I KNOW you will enjoy this fun kit.  WHAT ARE YOU WAITING FOR?

Just make sure you put the special code:

                                              PUMPKINDEAL 


to receive the first two months at 1/2 price.  AND don't forget to choose ME, JENNIFER KAY, as your demonstrator when you sign up for PAPER PUMPKIN.

I just received mine and am so excited to show you what I have made with it.  But it will be later this week I will share.


Friday, August 23

MEANT TO BEE......SPECIAL GUEST TODAY

HEY BLOGGIES,

I am so glad you stopped by today.  I want to introduce you to some fun creations by one of my team members - KAREN PARTIPILO.

Karen has such a sense of style in her creations and I really love the ones I am sharing with you today.

Karen sponsored a bridal shower for a relative recently.  She designed and created the invitations, the theme, the food, the name tags and much more.

Let's start with the invitation:


MEANT TO BEE - with the bee and honeycomb theme chosen, Karen used the honeycomb embossing folder on the so saffron card stock for the base of the invite.  She lined the back of the invitation with burlap and let the frayed edges just peek out for all to see.  She tied some lace around and hung a bee charm with some bakers twine off of the lace.

 As each guest arrived at the bridal shower, Karen had a special name tag waiting for them to write their name on it and pin it on.  This helped out of town guests to know all the attendees.

 Karen even carried the theme into the refreshments.  Aren't these cookies adorable??>!!  Sugar cookies decorated with yellow icing and a sugar bee attached with frosting.  YUMMY

Here is a closeup of the cookie with the cute sugar bee.

A special party favor was given to each guest as they left at the end of the day...a honeycomb wax candle, complete with another bee charm and a special punched tag with the thank you note.

A month or so later she held another bridal shower for a relative and here is what she created for that one:

This is a lovely invitation in night of navy and blushing bride. The bodice of the dress has sheer ribbon threaded through, with pearls added.

I want to thank Karen for sharing her beautiful creations with all of us.  I know you have enjoyed these as much as I did.

Stop back again and see more lovely creations, won't you?

Monday, August 19

PATTERNED PAPERS AND CHALK TALK

I absolutely LOVE the CHALK TALK STAMP SET and matching FRAMELITS.  I can't stop using it for all my cards!!  I know you will love it too.

 I also love the color combo of vanilla and black or black and white.  I used white on this card with my black cardstock.  Then I made 3 banners from patterned papers from Stampin' Up! - two of them from the Witches Brew DSP and one is a newsprint pattern.

 This is the first time I have used the Pewter Embossing Powder and it is really pretty.

The only thing else I added was a 1/8" black stitched ribbon tied in a simple knot.

Hope you enjoyed my card.  This would be perfect for a man, or for any occasion.

Thanks for stopping by.  Come back again to visit, won't you?

I am entering this card at:

LNS Challenge:  Patterned paper


WORLD MAP STAMP

I saw a beautiful card made by Justin Krieger, a fellow demonstrator (hey JK) and had to use his idea in a card of my own.  His was a Christmas card, but mine is an everyday card.

Very vanilla and coastal cabana card stock with baked brown sugar and coastal cabana ink.


 The extra large circle punch 2 1/2" is what I used for both the stamped sentiment and the layer behind it.


YOU mean the world to me, those of you who faithfully come visit my blog and also leave me such nice comments.  THIS is why I do my blog - YOU.  Thanks so much for your support.

Thanks for visiting today.  See you again soon.

I have entered this card at:

Try Stampin' On Tuesday

Friday, August 16

SMACKING ACETATE TECHNIQUE

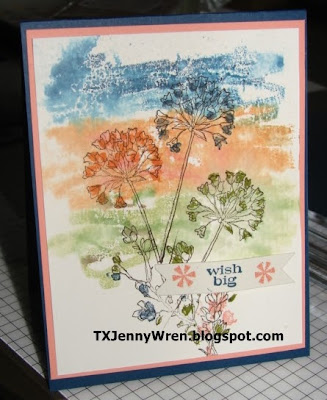
Today I have a fun card for you with a technique called SMACKING ACETATE.  Weird kind of name, but it gets your attention, doesn't it?  Basically you use your markers on plastic, acetate, even the solid acrylic blocks and lay down some ink in stripes, etc.  Then when you have your colors down, you spritz it all over with water and add your paper on top and rub it to get the ink into the paper.  Kind of like print making I think.  IT IS FUN.

 I used midnight muse, crisp cantaloupe and pistachio pudding for my ink colors.  The card stock used is midnight muse and crisp cantaloupe.

 I wanted to show a closeup of the banner with WISH BIG on it.  It is a very small banner stamped in midnight muse and crisp cantaloupe inks.

I used my markers to color in the second step of the two step stamp so that the colors would be a bit brighter than the background.  I LOVE how it turned out!!

Thanks for stopping by.  Try this technique, you will have some fun with it I am sure.

Entering this card at:

SUO CHALLENGE

The Paper Players

ABC Challenge

Creative Card Crew


Wednesday, August 14

TRY PAPER PUMPKIN FOR TWO MONTHS AT HALF PRICE...only a few weeks left to sign up

MY PAPER PUMPKIN KIT AT A SPECIAL PRICE FOR TWO MONTHS

WOW!!  My Paper Pumpkin Kits have been discounted to NEW SUBSCRIBERS for TWO MONTHS ONLY special price of only $10/month.  Isn't that amazing??!!  This special is to entice new subscribers to try My Paper Pumpkin Kits and to see what wonderful creations can be made with your monthly kit.

Q:  HOW CAN I GET THIS SPECIAL PRICE?

Answer:  You just visit mypaperpumpkin.com, click on "Join Now" and enter all of your information (especially make sure you choose ME as your demonstrator:  JENNIFER KAY, WOODLANDS, TEXAS. 

Make sure you select "1" as the quantity for monthly kits and enter the coupon code:

 PUMPKINDEAL 

in the promo code box which is located just below the kit quantity. You will then finish with payment information and click "Submit." You will receive a confirmation and a request to set up a password. You can return and do that at any time.

(If after two months you decide NOT to continue your subscription, you go back in to mypaperpumpkin.com and change your quantity to "0".) But I know you will LOVE the convenience and fun that arrives on your doorstep EACH MONTH.


At this wonderful special price, I HAVE SUBSCRIBED MYSELF SO I CAN HAVE THESE KITS TOO. I will be posted what I make with them so that we can share ideas.  Please send me a photo of what you make with yours, ok?

The first kit includes a "C" acrylic block for your stamps.  ONLY this first intro kit includes the block.  After that, it will include stamps, Stampin' Ink Spots, paper, stickers, accessories, etc. but NO acrylic block.

If you have any further questions that are not answered at the paperpumpkin webnsite, please contact me and I will be happy to help you.

Thank you for considering me as your SU demonstrator,.  I sincerely appreciate your support.

Thanks for visiting my blog!!

Tuesday, August 13

GUEST DESIGNER AT LATE NIGHT STAMPERS CHALLENGES


Hello Bloggies,

FIRST ANNOUNCEMENT:  The hostess code from the last week has now been closed and through Random.org the winner of $50.00 worth of FREE PRODUCT is:

KAREN P.

Thanks to all who ordered from me, especially during the Texas Tax Free Weekend.  I will have another HOSTESS CODE for the rest of August and will share that code with you tomorrow.

Now, on to my NEXT ANNOUNCEMENT:

I am humbled to announce that I have been chosen as one of the GUEST DESIGNERS over at the Late Night Stampers Challenges (LNS).

There are so many amazing stampers out there that I am amazed I was chosen.  I hope I can live up to what they expect from me for these next 3 months.

This week, LNS Challenge is to use SPECIALITY PAPER.  I already submitted one card yesterday when the challenge started, but I immediately had another idea I wanted to share with you.

 I did something similar to this card last fall, but I wanted to update to the most current designer paper available from Stampin' Up!  The paper I used for the pumpkin is WITCHES BREW.  The background paper is a newsprint design, but I cannot remember which paper pack it is from.

 I made a banner with the newsprint paper and with a piece of ALWAYS ARTICHOKE card stock on top.  I stamped several times with versamark and then heat embossed with white embossing powder.  I tied a 1/8" piece of PUMPKIN PIE RIBBON at the end of the banner.

This paper pieced pumpkin idea came from my quilting that I also love to do.  This type of creating is fun with both paper AND fabric.  Applique is the name of it in quilting.

Thank you for visiting my blog.  I sincerely appreciate your support.

Hop on over to LNS to see other cards submitted for this 2 week challenge.  Why don't you submit a card of your own for this challenge?


Monday, August 12

MONDAY MORNING SPOOKINESS...

GOOD MORNING WORLD!  What a beautiful morning here in East Texas.  We got some amazing thundershowers (which we DESPERATELY needed) and this morning everything smells so clean and fresh.  I am thankful for the rain.

This morning I have a fun halloween card using the WITCHES BREW designer paper.

 I am loving this new WITCHES BREW DSP from the HOLIDAY CATALOG.  There are wonderful prints like the stripes I used on the bottom of my card, as well as fun pieces to use as is on the card like the bats on the newsprint.  There are all sorts of halloween words too like Dragon's Teeth, Pumpkin, Open, Candy shop, etc. you can punch out and use on your cards.

I used my last year's SPOOKY stamp for my sentiment.  I tried a few of the words but I needed some more pumpkin pie color in there.  I finished it off with polka-dot ribbon and three candy dots in pumpkin pie.

I entered this card here:

Late Night Stampers

Mojo Monday